Discussion
The focus of this month’s article is an introduction to “how to generate power without using force”. Most Doctors are extremely proficient at the film and analysis but struggle with the delivery aspect of the correction process. I separate these two as static and dynamic aspects of the corrective process. At present, all vector upper cervical techniques use a combination of the triceps pull and the tension generated in the settle back. Grostic, NUCCA, Orthospinology all “settle back” which creates tension similar to the physics spring model. The pelvic triangle, as it is compressed, builds potential energy until it is converted to kinetic energy. The end result which creates a power generation is relatively perfect. This is because the pelvis is the largest and most powerful lever and as it is compressed it has the ability to generate significant potential energy. It is also very stable because the feet are anchored to the floor in a static position.
The settle back position, however, is not the optimal pose to utilize this potential.
The settle back displaces the mass of the doctor off of his/her power position and diminishes the potential availability of power. The center of mass of the doctor ranges from the mid- abdomen to the sternum. It is never the episternal notch. To illustrate this point, lean against a wall as you would push it with your maximum force or leverage.
The first thing you will notice is that your power is from your legs (pelvic triangle). Next you will see that your arms are locked with your mass (around the sternum) and set against the wall. You do not feel your power position to be the episternal notch. To compensate, the “triceps pull” is recruited, which does not have the pelvic potential as it is not stabilized (i.e., as the pelvis with the feet on the floor). This is a crucial point. The triceps or arms are much less likely (one arm straight, one arm slightly bent) to deliver a repeatable linear force like the pelvic triangle, because they are not anchored.
What is created is a maximum multiple power system
from a stable stance without moving parts to maximize linear deliverability and minimize a curvilinear force
The Three Triangles
The power of the correction comes from the pelvic triangle, the direction of the vector comes from the locking of the shoulder triangle, and the breaking of resistance comes from the wrist triangle.
Pelvic Triangle
The pelvic triangle is the power source. It must be brought to tension. Gregory realized this when he spoke of the “max settle back”. The process to max settle back is congruent with maximum potential energy. The missing step is to set your center of mass against the resistance. This is the place where your mass will be set against the coordinate point and the contact. This place will be different on each doctor but is an intuitive place no different than knowing when you have set your mass against something you want to push.
As your skill grows, so will your confidence in trusting your innate wisdom in determining your adjusting process. When it feels right, makes sense, and is comfortable for you, you do your best work in a space that is perfect for you.
After you roll up on the balls of your feet and your mass is set, you will feel the power of this position compared to your past stance. The maximum power is then created as you compress the pelvis to the floor. This is accomplished by increasing the lordosis of the lumbar spine.
The Shoulder Triangle
The shoulder triangle is the triangle that directs the calculated vector. It delivers FORCE from the pelvic triangle in a maximum power correction but does NOT generate force. It is simultaneously brought to maximum tension via the triceps pull at the same time the pelvis is brought to maximum tension.
Both the pelvic triangle and the shoulder triangle are moving to maximum power and are at maximum power just prior to contact.
The Wrist Triangle
The wrist triangle is the resistance breaker. Resistance is never overcome in a downward compression, but in a linear direction down a specific pathway. This concept is involved but easily understood at the QSM3 seminar. Without this crucial piece, resistance will never be consistently and effectively overcome, and corrections will never be above poor.
Creating the Pelvic Triangle Force
The protocol to create maximum power uses the least effort and the most linear force in a dynamic process. Like hitting a baseball or golf ball it is a dynamic motion. It is not a step-by-step, stop-start string of actions. It must be comfortable and fluid. All hand-adjusting procedures have been previously performed in a step-by-step protocol that has left the delivery of maximum power at a great disadvantage.
The delivery has become an act of generating force, not maximum power.
Maximum power is, as said, a fluid set of events that are interlinked like the perfect swing. When you practice these steps with the understanding that maximum power is created:
- from a comfortable dynamic tension position
- with minimal moving parts
- that sets your mass against resistance pathways, then…
Your effort will become effortless and maximally productive.
CASE STUDY
This Month’s Case Study:
Compression Continued
Discussion
This is a first. A compression misalignment that decompressed to the opposite side laterality. The QSM 3 protocol was followed and the result was 95% correction.
Pre X-Rays
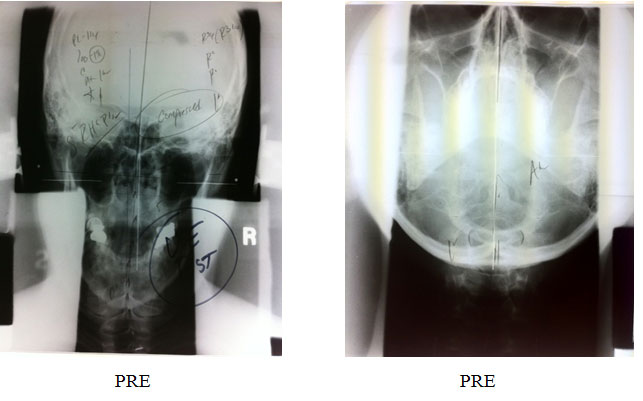
Pre Information
Anatometer: L17lbs P8 L.2
Leg: R1”
Calculated Vector: SRH1/2A1/2
Comments: The compression is initially considered based on the leg and weight which is in the opposite frontal plane. (Notice the bowing in the lower angle on the Nasium.)
Initial Goal: Get the leg and the weight on same side
Headpiece, Skull, & Pelvic Placement: Skull – close the left posterior quadrant to set the vector LP
Hdp – drop the cephalic, to have the force come left to right
Chin – lift chin to turn pelvis P to A
Nose, Pelvis – right side preset A to P
Right shoulder – relax I to S (to allow force to come around the skull) and set A to P

Post One Pictures
Post One Information
Anatometer: R2lbs P2 R0
Leg: R1/2”
Calculated Vector: I4 3/4L3 1/4A1/2 – This is now used as the pre vector
Comments: The compression is REMOVED. (Notice the bowing in the lower angle on the Nasium is significantly diminished.)
Goal: Correct to ZERO
Headpiece, Skull, & Pelvic Placement: Skull – close the right posterior quadrant to set the vector RP (Anatometer)
Hdp – drop the cephalic, to have the force come right to left
Chin – tuck chin to turn pelvis A to P
Nose, Pelvis – left side preset P to A
Right shoulder – relax I to S (to allow force to come around the skull) and set P to A
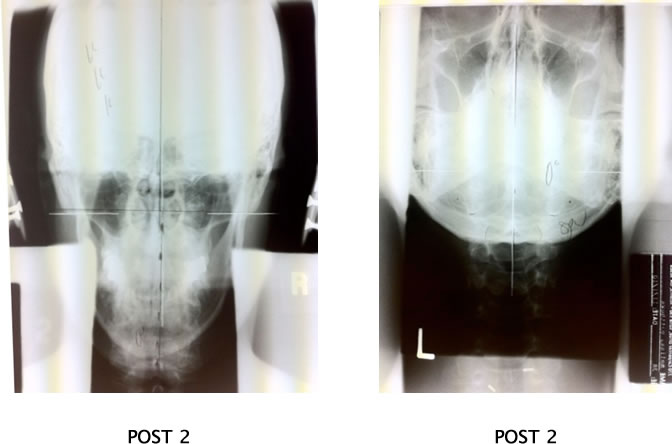
Final Post
Anatometer: R1.0lbs P1 R0
Leg: R1/8”
Final Remarks
Notice the linear decompression of the lower angle. The patient is still slightly off vertical but should come centered quickly as the body adapts. I generally DO NOT attempt to correct on the first office visit but only decompress. If you try to correct too soon, the misalignment may be unstable and re-compress back to its pre-position. I usually take 2 to 3 subsequent office visits (using the pre-vector and anatometer numbers) to continue the decompression process to ensure it is completely linear (leg and weight together), stable, and decompressed.
(This is because of the lateral switch I wanted to go after.)
When you understand the relationship of the misalignment, anatometer and the leg at a global level, you can work with confidence.
On Purpose and In Progress,
Russell Friedman, DC